ezSeller team don’t look into your data, they only look into the data when you complain problem happen.
ezSeller store all data in the PC which install ezSeller. The information which store in server are:
- Printed Order Id list: If you turn on sync key for sync printed order between multiple ezSeller, esSeller will send printed order id list to server for synchronization. Order id only, don’t have order detail.
- Auto boost product id: ezSeller save auto boost product id list in server. Product Id only, don’t have product detail.
- shop id: for ezSeller to block other ezSeller add your shop into their ezSeller.
Yes, ezSeller provide 14 days free trial period. You need license key to continue use ezSeller after the trial period.
ezSeller count as per installation. One PC is one installation. If the ezSeller connected to 10 shops in Shopee, it still count as 1 license.
Unlimited. ezSeller don’t have limit on allowed shops.
Download latest ezSeller from this site, then double click the downloaded exe file to start the installation process. When first time start ezSeller, you need to input user name, user phone no, email and company name.
Please check our tutorial video for how to install step by step: Tutorial
Please check our tutorial video for how to add a shop.
You can go manual “Settings” -> “Shops in Shopee” to add your shop.
Following are the steps to add a shop into ezSeller:
- Provide a nick name for this new shop.
- Click on a link to open a Shopee page in web browser. User need to login the Shopee page and grant to permission for ezSeller able to access the order data. After successfully grant permission in Shopee page, one shop id will show in the page.
- Take the result shop id, and input in the shop id field.
- Click on the “Update Shop Info” button, to get shop information from Shopee. If step #2 successfully grant permission, then this will return correct shop information.
- Click “Save” button to save shop information.
(1 shop only allow to add into 1 ezSeller, “Save” button will return error if this shop already added in other ezSeller)
This limitation is use to avoid not shop owner access the shop’s data. This issue can be solve by one of following method:
* Delete the shop in the another ezSeller, then try to add again in current ezSeller.
* Use the shop’s seller account to chat with “eseller.com.my” seller inside Shopee. “eseller.com.my” will help to increase allowed ezSeller.
Basically, one shop is allow to use inside unlimited ezSeller. But need to ask us to open the allowed count.
Normally, can use following 2 steps to select orders:
- Select all order which don’t have tracking number.
- Unselect the order which don’t want to process, for example the product name for some pre-order product or out of stock products.
The right top combobox is the filter order with or without tracking number. Select the “No Tracking Number” option can get all orders which don’t have tracking number. Then just click the left top checkbox to select all orders.
Please check out tutorial video for how to process orders.
After selected orders which you want to process,
- Click the printer toolbar button to start to process those selected orders. Then the “Print Order Window” will show out.
- In the “Print Order Window”, You need to check following setting before generate new AWB pdf file:
- The Pickup/Dropoff information is correct
- The output format is correct
- The total output order count is correct.
Please check tutorial video for how to handle this issue.
The main steps is (1) click “Continue” button, (2) come back to process again the recorded skipped orders after few hours.
“Processing” status order is a state between “To Process” and “Processed”. Usually, order in “Processing” status is very short time. But occasionally, due to Shopee internal problem or integrated courier’s server problem, an order may stay in “Processing” status for long time. Only in “Processed” status order has tracking no (AWB). So after wait for a while, we need to skip those “Processing” orders, and continue process those “Processed” orders.
The “Continue” button on the Progress windows is using for this purpose. When user decided give up to wait for those “Processing” status orders, user can click the “Continue” button to make the whole process continue. ezSeller will auto add all the skipped order into “Order Group” ComboBox, and also pop out a text file with skipped order id to user. After system recover, user can use the skip list in the “Order Group” ComboBox to continue process all skipped orders.
Please check here:
You can use Google Chrome or Acrobat Reader to print the PDF file, then can use their “FIT” or “Fit to printable area” setting to make A5 PDF extend to A4 size.
You can choose the “Slides” option “1 slide in 1 page”, then you will get A6 size pdf output.
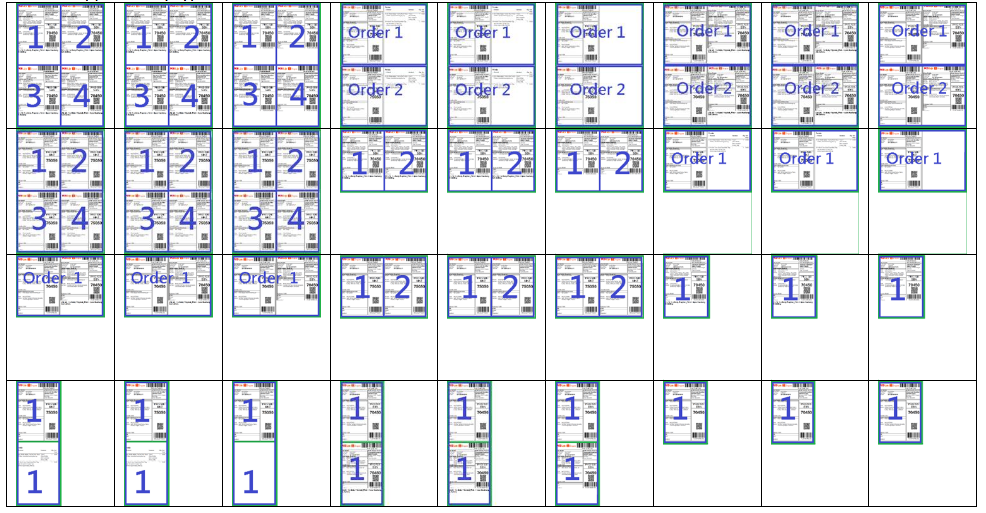
ezSeller support many types of format:
We can use the “Synchronize Key” to share data between two or more ezSeller. ezSeller will download same data (different order list) from server if “Synchronize Key” is same.
We can change “Synchronize Key” by menu “Setttings” -> “User Information” -> “Synchronize Key”.
Suggest set to same synchronize key within same company, and try to set it as long as possible to avoid set to same key between two different company.